
Fermented Dandelion Stems Recipe
It’s easy to get into a rut with our favorite herbal preparations and forget to make the effort to try out something new.
Many years ago, my friend Kimberly (author of HerbFairies) told me it was her goal to make one new thing with her favorite herbs each year. This has long inspired me to do the same.
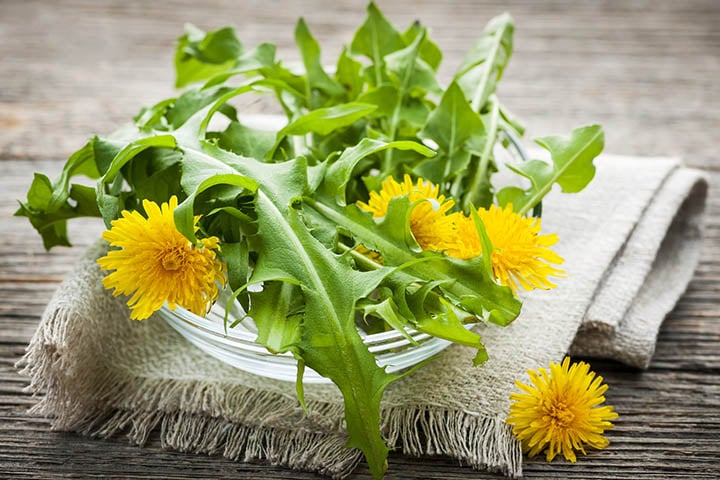
I was recently making dandelion pesto, which is one of my favorite springtime dandelion recipes.
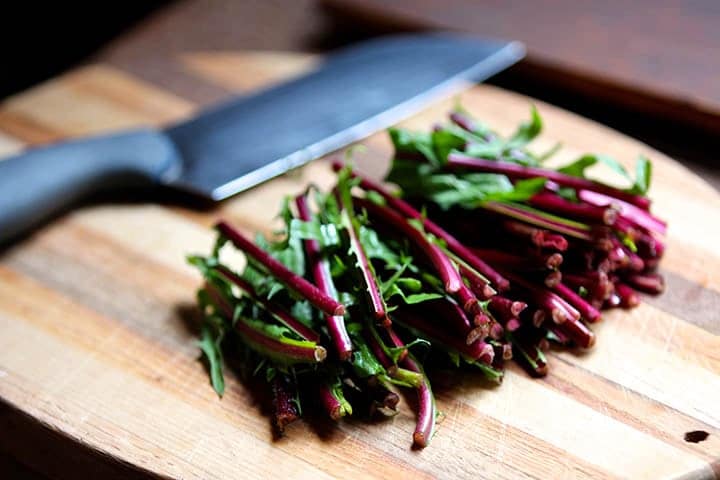
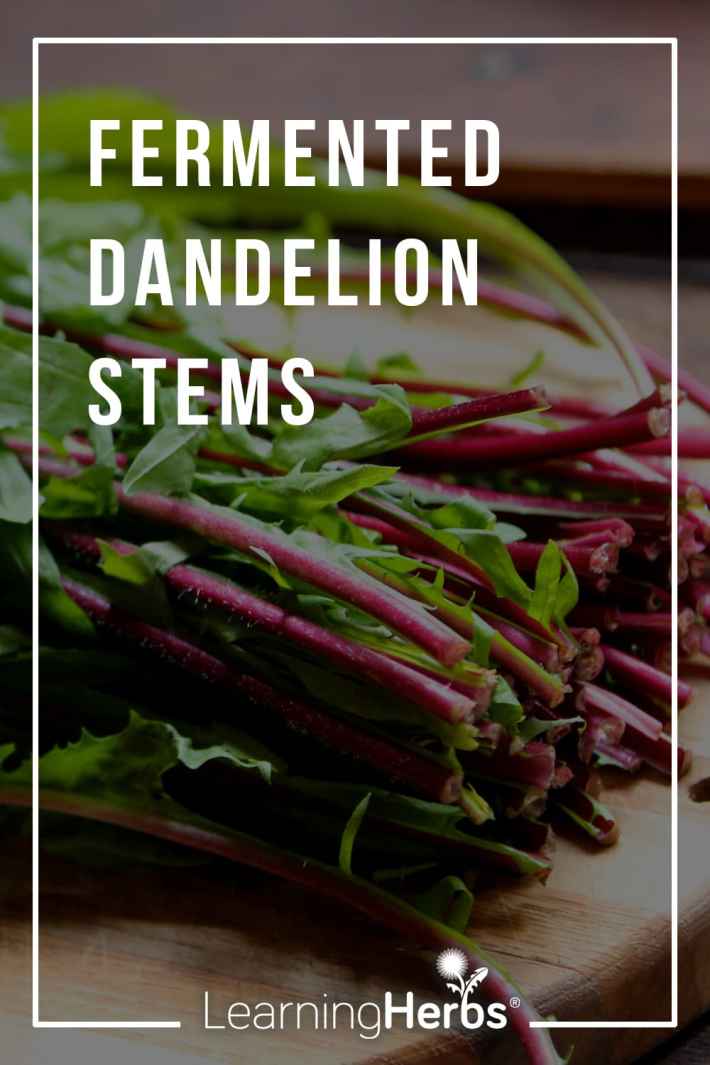
I gathered up a bunch of dandelion leaves and began by chopping off the bottom portions of the stems. There happened to be a lot of stem. Just as I was about to sweep them into the compost, I thought, “I wonder what I could do with those?”
I remembered a recipe for fermented chard stalks in one of my favorite cookbooks, The Nourished Kitchen by Jennifer McGruther. I decided to try something similar with the dandelion stems…and the result was so good I knew I had to share it with you!
Why Ferment?
Fermentation is a way to preserve vegetables while increasing the nutrients in your food. Vegetable fermentation is a form of lacto-fermentation that adds beneficial bacteria to your diet which can be very supportive for digestion.
Admittedly, fermentation can be a bit overwhelming at first. But, this simple recipe is an easy way to get started.
Here are the two most important tips when doing this recipe:
- Use clean utensils, jars, cutting boards, etc. Sterilizing them in a dishwasher or pouring just-boiled water over them is a good idea. (Note: I didn’t do either and mine turned out fine. This is just an extra precaution.)
- Make sure your brine covers your dandelion stems at all times.
Health Benefits of Dandelions
Dandelions are so easy to love it’s amazing they are so readily despised!
Dandelions are easily one of our most nutritious spring edibles. They are high in Vitamin C, phosphorous and beta-carotene.
One of the most wonderful benefits of dandelion is its taste! The bitter taste of dandelions has a powerful action on your digestive function. Tasting something bitter increases saliva which helps to break down carbohydrates in your mouth. This, in turn, stimulates many digestive secretions including HCL (the stomach acid that does many things, including break down proteins), and bile (which is important for digesting fats).
It’s a famous folkloric tradition to eat your bitter spring greens as a way to transition from the traditionally heavy and fatty foods of the winter to the fresh foods of the growing season. There are many dandelion recipes out there.
Fermented Dandelion Stems Recipe
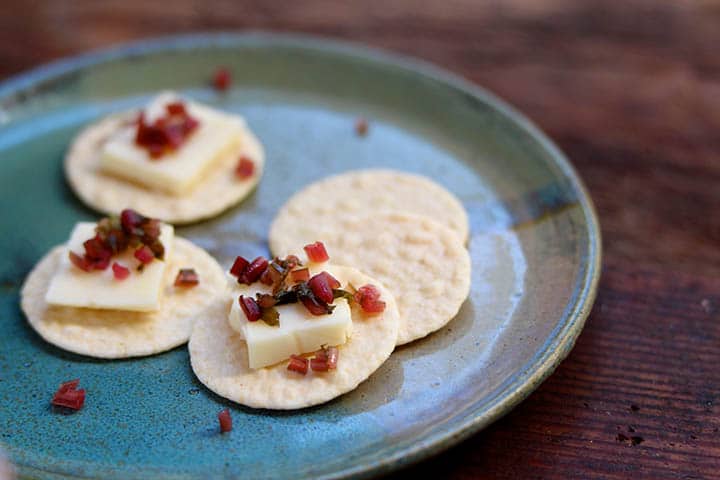
This recipe pairs the slightly bitter taste of dandelion stems with the sour taste of a lacto-fermentation. The combination of this springtime bitter and fermentation is a powerful digestive aid. I add several spices to the brine to give it a delicious flavor. These stems can be eaten as an appetizer, or minced and enjoyed over food, in sandwiches or mixed with veggies. If you don’t have dandelion stems you could try using other types of vegetable stems such as chard or kale.
What you’ll need…
- 1 large bunch of dandelion stems
- 2 cups of water
- 1 tablespoon salt
- 1/2 teaspoon whole peppercorns
- 1/2 teaspoon whole allspice
- 1 teaspoon whole coriander
- 1/2 teaspoon whole mustard seeds
- 1/2 teaspoon chili pepper flakes
- 1 bay leaf
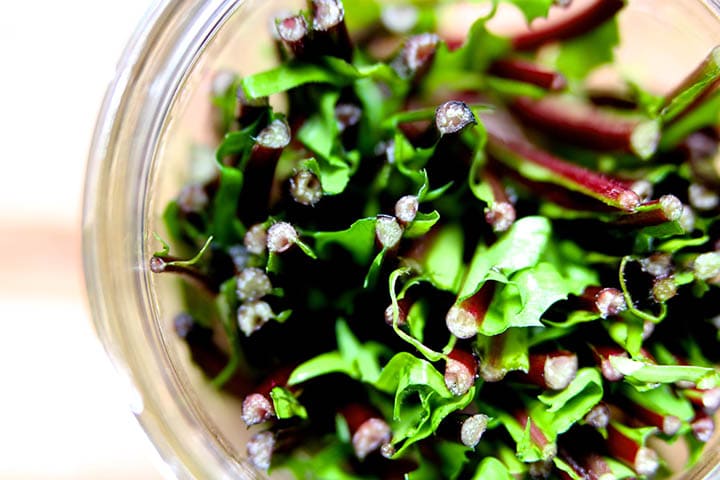
- Place the dandelion stems in a glass jar that fits their size. A pint size mason jar worked well for me. Using a glass jar that has been made for ferments and has an airlock is ideal, but not required to make a good ferment.
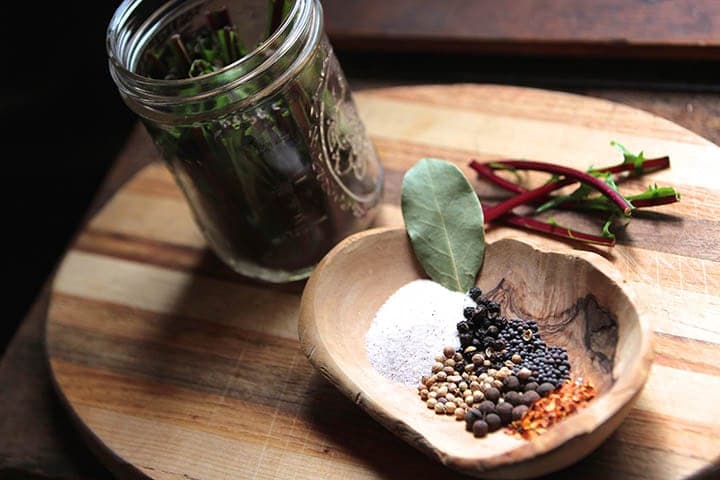
- Bring the water to a boil and add the salt and spices. Stir well until the salt is dissolved. Let it cool to around 95 degrees F or until the liquid feels neutral when you stick your finger in it.

- Pour the cooled brine over your dandelion stems. I had extra brine so I made sure to get most of the spices in the jar with the dandelion stems and discarded the extra brine.

- The next step is that you want to make sure the dandelion stems remain below the brine. To do this I cut a piece of cabbage leaf to the size of the jar and tucked that in on top of the dandelion stems. I then added a small, sterilized stone to keep the leaf weighed down. You’ll want about a 1/2 inch of brine left above the stems.
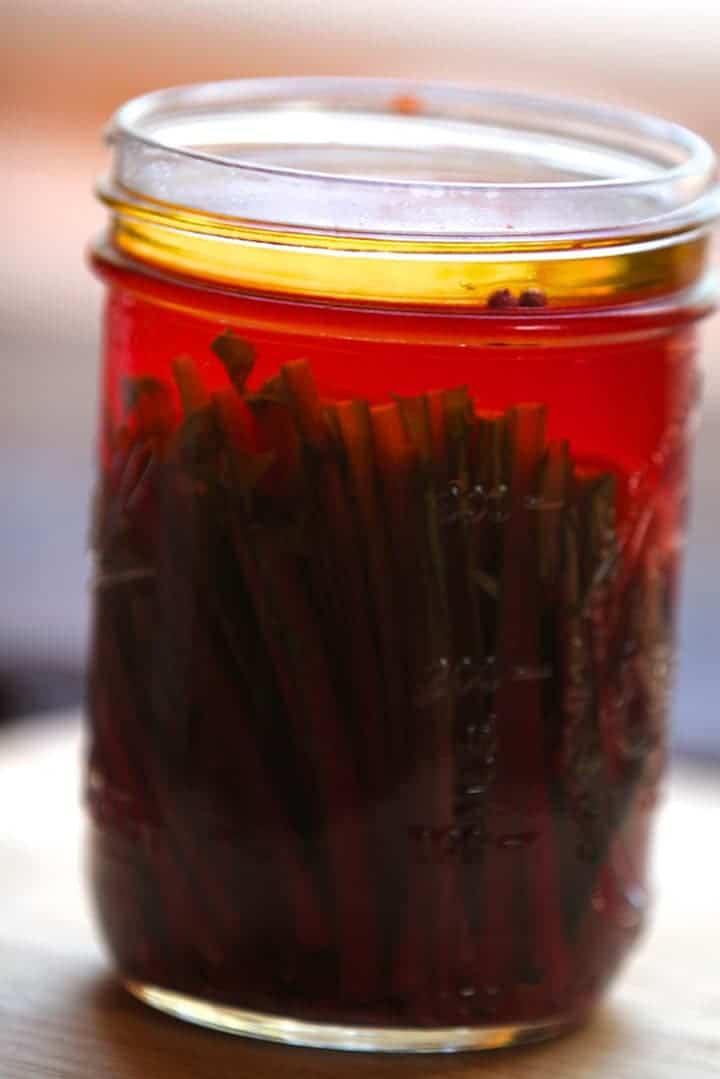
- Before placing the lid on the jar, pour enough olive oil in the jar so that it forms a layer on top of your brine. This helps form a barrier between your ferment and oxygen, which will help decrease risk of mold. I used a plastic canning jar lid. I’m not sure if a metal lid would react with the salty brine or if it would fit too tight not allowing CO2 to escape.
- Place your jar in a warm part of your kitchen. A temperature of 68-72 degrees F. is optimal. Place a small plate under the jar in case any of the brine escapes during fermentation.
Now for the hard part: waiting!
I checked on my fermentation every couple of days to make sure the stems and cabbage leaf stayed under the brine. A few spices had floated to the top so I removed them. After a week, I started tasting the stems to see if they were done. If you are new to fermenting, it’s a good idea to taste your ferment frequently so you can note the changes. When the ferment isn’t done the stems will taste overly salty. As the fermentation progresses they will have a more sour or tangy taste to them. The fermentation process may take 2 to 4 weeks.
Sometimes fermentation goes wrong and mold develops. If this happens, discard your project and start again. There are many books and websites out there to help you with troubleshooting ferments. Hopefully this simple recipe is smooth sailing for you.
Fermented Dandelion Stems Recipe


I’ve made dandelion honey which is really lovely. Might try this recipe when I make the honey next.
To Stephanie and Cathy, How do you make your dandelion syrup and honey?Thanks, Diana
Here’s the recipe we love for dandelion syrup. http://www.examiner.com/list/dandelion-syrup-sunshine-a-jar It’s delicious!
we have made dandelion flower syrup and it is wonderful!
You don’t need to discard it If you get mold. Just skim the mold off. I’ve had sauerkraut have mold on top But the kraut underneath was the best I’ve made. I’ve even heard of sandor Katz (the fermentation king) have fly maggots on top with wonderful food underneath.
It really depends on the type of mold. Some growths are okay, some aren’t. Describing different types of molds/yeasts was beyond this article so I recommend people find other reputable sources for troubleshooting.
Thank goodness! I was mite confused when you said “stems” because my first thought was the stems of the flowers and I wasn’t sure how those could be made palatable. These fermented leaf stalks sound like a wonderful experiment. My favorite way to enjoy dandelions is to just eat the blossoms fresh. Where I live in the mountains there just isn’t an abundance to forage and enjoy.
In retrospect it would have been better to say leaf stalks. Luckily a picture says a thousand words and hopefully makes up for my confusing terminology. :)
Why not put some stems together too, won’t hurt to eat a few I think ;-)
Thanks for the recipe, I’ll try to find some dandalions on Corfu. Is it possible to ferment the flowers too?
In the Eastern US dandelion stem are usually white (like your top picture) and chicory stems are red. (Chicory is equally edible but somewhat more bitter) Are you sure those stems are dandelions and not chicory?
I got these dandelion stems from the store (my local dandelions weren’t ready yet). Sometimes store bought dandelions are closely related to chicory. Without the flower it’s hard to tell. It doesn’t matter though, they can all be used in the same way.
This is great! Thanks. When will the Herb Fairies series be available for purchase?
Herb Fairies coming next week! But please click above and get on the list. THANKS!
We made sure to sign up for email notifications. Loving the cookbook. Thank you! Our family is so grateful for this learning opportunity, it’s fun for us all.
While it’s possible to eat fermented foods that have mold growing on the top, for those of us sensitive to mold, I don’t recommend it; even though you just see stuff on top, you’ll probably have microscopic hyphae extending through your ferment. We always use an airlock system to ensure proper lactofermentation with much success and very reduced incidence of mold or off-ferment. Yes, you can be casual, but if you’re sensitive to molds, I don’t recommend it.
We have plenty of dandelions ready for doing something with. I’m going to give this a try (btw – fermented asparagus spears fresh from the garden are absolutely divine; 2% salt solution, some garlic, some peppercorns and a bit of time!)
My diet includes dandelions (root tea in the winter and greens in smoothies in the spring and summer)
I’m new to fermenting and cannot wait to try this! Thank you so much for this!.
What can I use in place of the salt.
Thanks
For a lacto-fermentation you have to use salt.
Salt is used to keep the fermented vegetables crisp. Use non-iodized salt and non-chlorinated water. The lactic acid changes the pH and kills bad bacteria. That is an anaerobic reaction. If food is out of the water, it may form a layer of yeast or mold which can be skimmed off. Cooking will kill those good bacteria – don’t do it.
I am working on kraut and kimchi ferments that are 2 or more years old and were kept at room temperature during 90 degree summers. Delicious!
Hello and “Thank you!” for the recipe. I was wondering if there is any way that you could put the recipe in a “printer friendly” format? That would be great! Thanks again! God speed.
We will eventually have PDF recipe cards… for now, they are very printer friendly. You’ll notice minimal ads, one column… just hit Print. You can also simply copy paste the info into a notebook, evernote app, etc…
Thanks for your reply John! I will print as you have suggested and keep an eye out for the PDF recipe cards. The pictures along with the recipe are beautiful!
My Grandpa’s recipe for dandelion wine. Great website.. thanks..
WILTSHIRE DANDELION WINE – SHERRY STYLE
(circa 1900)
10 QUARTS DANDELION HEADS WITH CALYX AND BITTER STEMS REMOVED
3 LEMONS [RIND ONLY] FINELY CUT (JULIENNE)
3 ORANGES [RIND ONLY] FINELY CUT (JULIENNE)
3 TBSP. GINGER ROOT PEELED AND CHOPPED FINE
10 QUARTS PURIFIED WATER ( DISTILLED)
7 & 1/4 LBS. DEMERARA SUGAR
JUICE OF ONE LEMON
3 TSP. WINE YEAST
– bring 5 quarts water to the boil, then leave to cool
– place flower heads in large crock and pour cooled water over them
– leave for one day, covered, stirring occasionally
– pour the whole into a large pot, add ginger, lemon rinds and orange rinds, gently boil for 30 minutes
– strain liquid and pour back into rinsed crock, add remainder of water ( 5 quarts)
– mix sugar and lemon juice into liquid
– when cooled to room temperature, cream the wine yeast with 3/4 C. of the liquid
– stir well, let stand for 10 minutes to activate, then stir into crock liquid
– cover crock with a cloth and let stand for 2 days
– after 2 days pour liquid into a carboy with a proper airlock
– leave mixture in carboy until all fermentation has ceased and gas bubbles have stopped
– keep carboy tightly closed for approx. 2 months
– finally , siphon the clear amber liquid into bottles and cork
– should be kept for approx. 6 months before drinking
Thanks for sharing! I love dandelion wine.
Thanks so much for the recipe. I will try. I learn to eat chicory and dandelions when I was at the convent just 16 years old. The congregation in Peru was an Italian Order “Francescane Misionari di Gesu Bambino” as a Italian they eat different leaves and roots; in salads, soups,stews, soufles, etc
The salad dressing made only with olive oil, lemon/limes or vinagre, ground black pepper, and salt usually served with meat poultry , fish or chesse.
As I dig up my garden and find dandelion roots, I take them to the kitchen, where I wash them and cut them up. I then roast them, small amounts in a frying pan, large amounts on a cookie sheet in the oven. I then use the roasted pieces like coffee beans: grind, and use as you would coffee grinds.
Thanks, Rosalee! Neato. Don’t know that I would’ve thought of that one. Gonna do it. They won’t be as pretty as your pink ones, but still.
We’ve fermented beet stems and my little ones call them “beet sticks.” Delicious! We will try dandelion next! Thank you so much!
Wow, Roaslee, all the pictures you use in your work are so excellent !
Thank you!
So why (in response to the person asking what can be used in place of salt) can’t you use a starter culure such as Caldwell’s for vegetables?
That’s a good point. I forget about not using salt because it tends to have more chance of mold and things tend to be mushy. You can use less salt and whey. Or, another option is to use the leftover juice from another batch of a ferment (which may or may not have salt in it). I know some specialty coops sell those.
http://www.culturesforhealth.com/compare-salt-whey-starter-culture-ferment-vegetables-fruits-condiments
Love fermented foods. Keep trying to get my son to eat them, but no luck so far.
I love this recipe with Dandelion Greens and Preserved Meyer Lemons by Herbalist Lily Mazzarella:
http://farmacopia.net/dandelion-greens-with-preserved-lemons/
Love the idea of placing a cabbage leaf on top. That’s always been my problem, what I can use to push the vegetables/herbs down in the brine. My thought was to get my husband to cut a round to fit the jar. Your idea is so much easier. Thank you!
red stems? Mine aren’t red… or is that after the brining?
~Tess
Rosalee, did you use a cabbage leaf, then a stone, then the oil? When tasting the stalks to see if the fermentation is complete, how is that done without disturbing the oil? I’ve never done this before and I’m a tad confused. Thank you for your recipe.
I am totally lost on adding the oil too. I have never seen a fermentation recipe with oil.
Yep, oil goes on last.
Thanks for the answer, Rosalee. I’m looking forward to trying this. Have a great evening.
I STRONGLY do not agree with the oil topping – much discussion on the web about the safety of that. Here’s just one.
http://www.intentionallydomestic.com/is-topping-a-ferment-with-oil-an-acceptable-replacmeent-for-an-anaerobic-environment/
This coming from someone who drinks raw milk on a regular basis ( i.e. someone not a afraid to challenge conventional thinking) LOL
I started slowly buying jars with airlocks, as I know they can be pricey – but one or two here or there..
http://www.pickl-it.com or
http://store.probioticjar.com/?Click=4 or just google….many love the Harsch crock –
Thanks for sharing your opinion. I agree that the jars with airlocks or jars like Fido are ideal. However, for those unwilling to buy speciality jars the oil on tops works great. This is a traditional method that has been used for a long time and, as far as I know, there has never been a case of botulism associated with using this method. Only speculation.
Botulism takes a higher pH. The lactic acid will kill botulism. I use the cabbage leaf and something to weight the food down below the liquid. I like the stone and will have to find a river rock. I have never used oil. Wide mouth Mason jars with plastic lids work just great. Use a cereal bowl underneath. The CO2 generated by the ferment will push the liquid out.
Huge thanks for sharing your lovely recipe and gorgeous photo’s, I can not wait to make these as soon as my Dandelions come up. I so enjoyed reading your recipe and all the wonderful suggestions from your readers. What a bright spot this was in my day, truly grateful and thankful.
Dandelion Stems — I love it. You clever girl. Thanks for drawing my attention to them. I’m now thinking of pickling them. Hugs to you.
tyr makeing tea out of dandelion root it is good for you